🛠️ Method 1: Manual Creation of a New Utility Set
Steps to Create a New Utility Set Manually
-
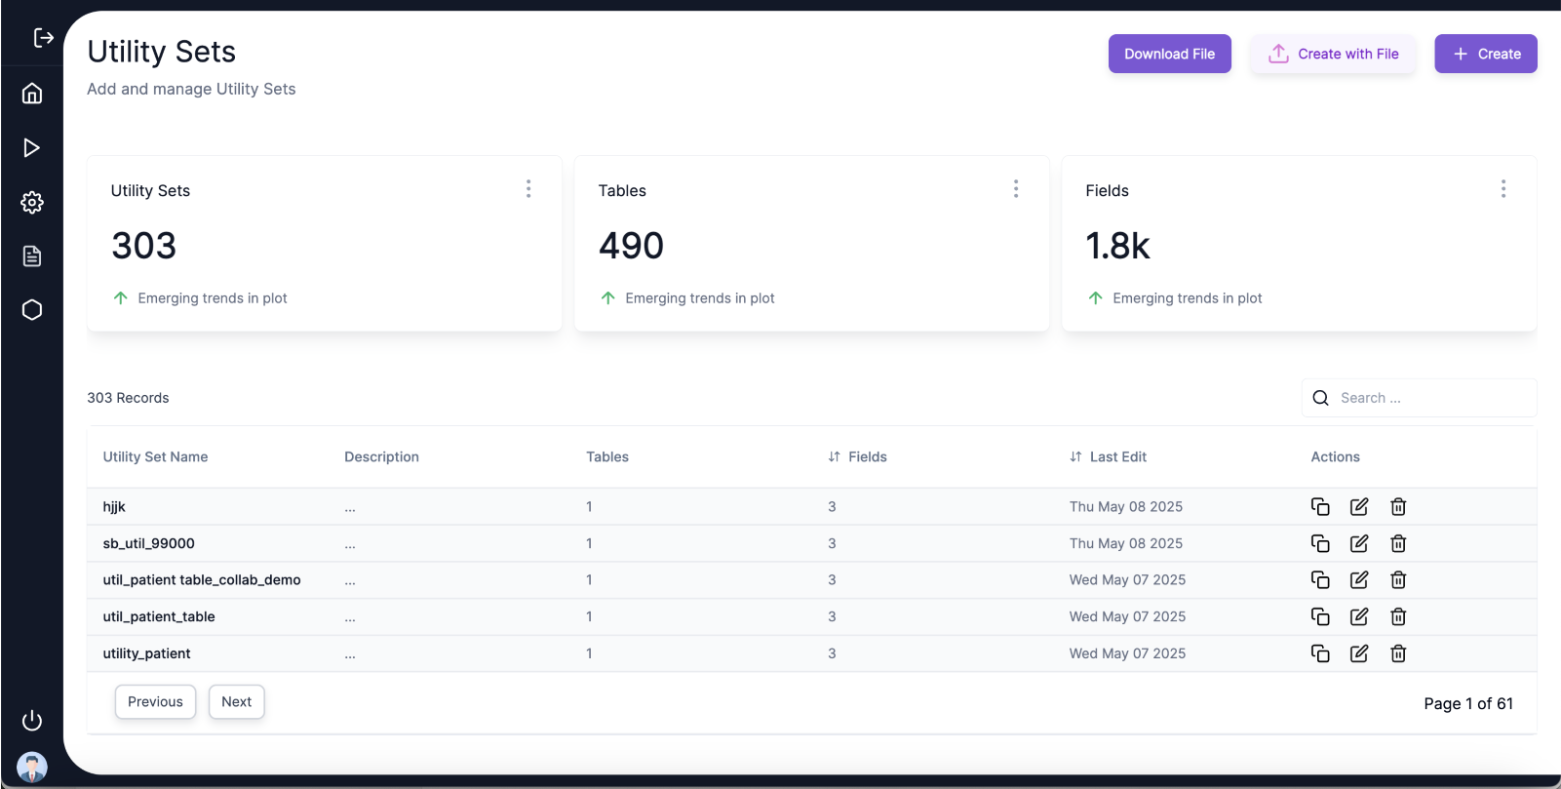
Navigate to Utility Sets Page:
- Click on the Create Button on the Utility Set view. You will be directed to the Create New Set view.
-
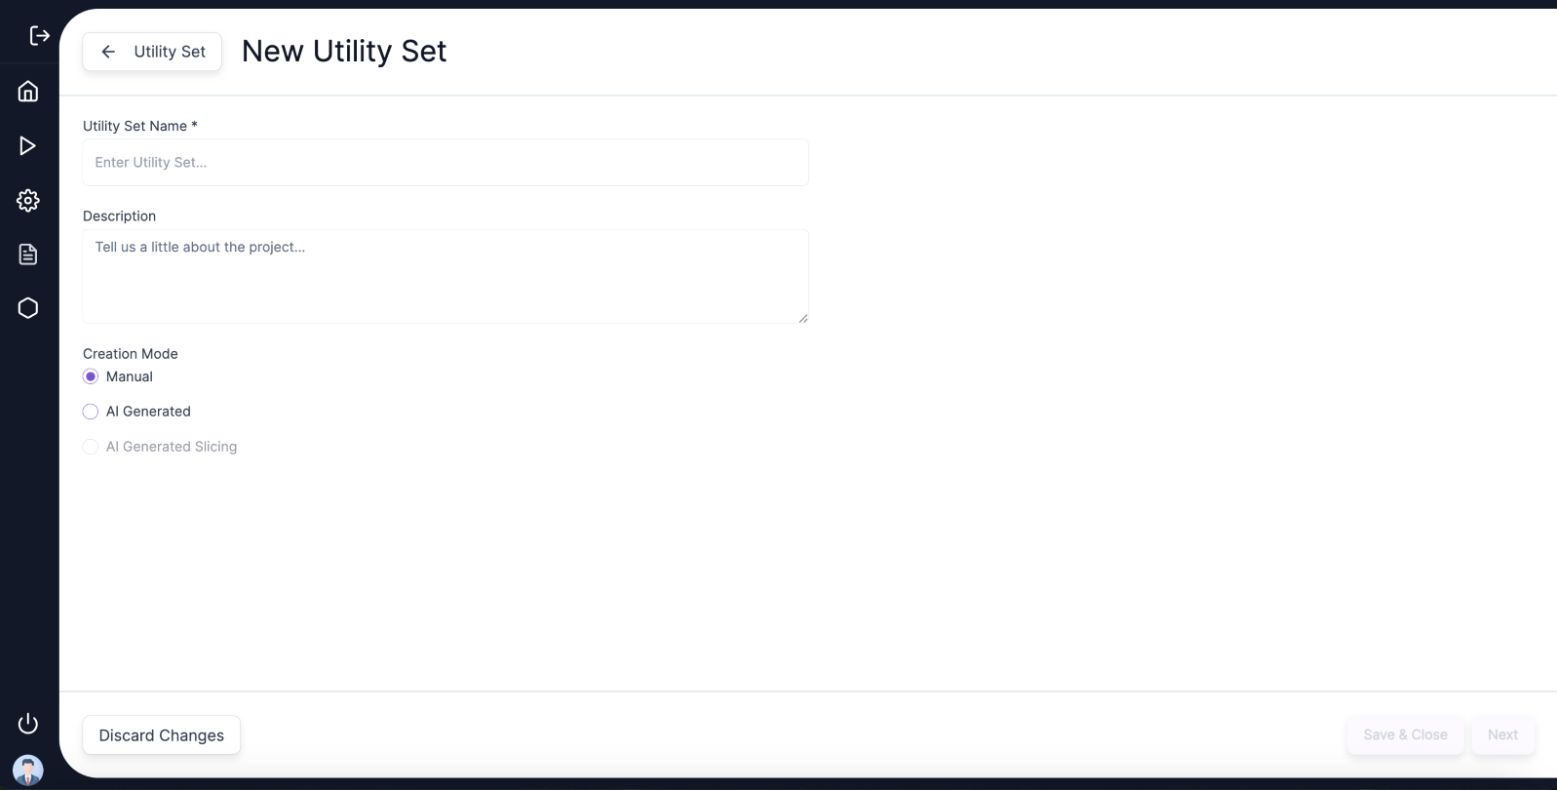
New Utility Set Details:
- Enter the Utility Set Name and set the Creation Method to Manual.
- Click Next to proceed.
-
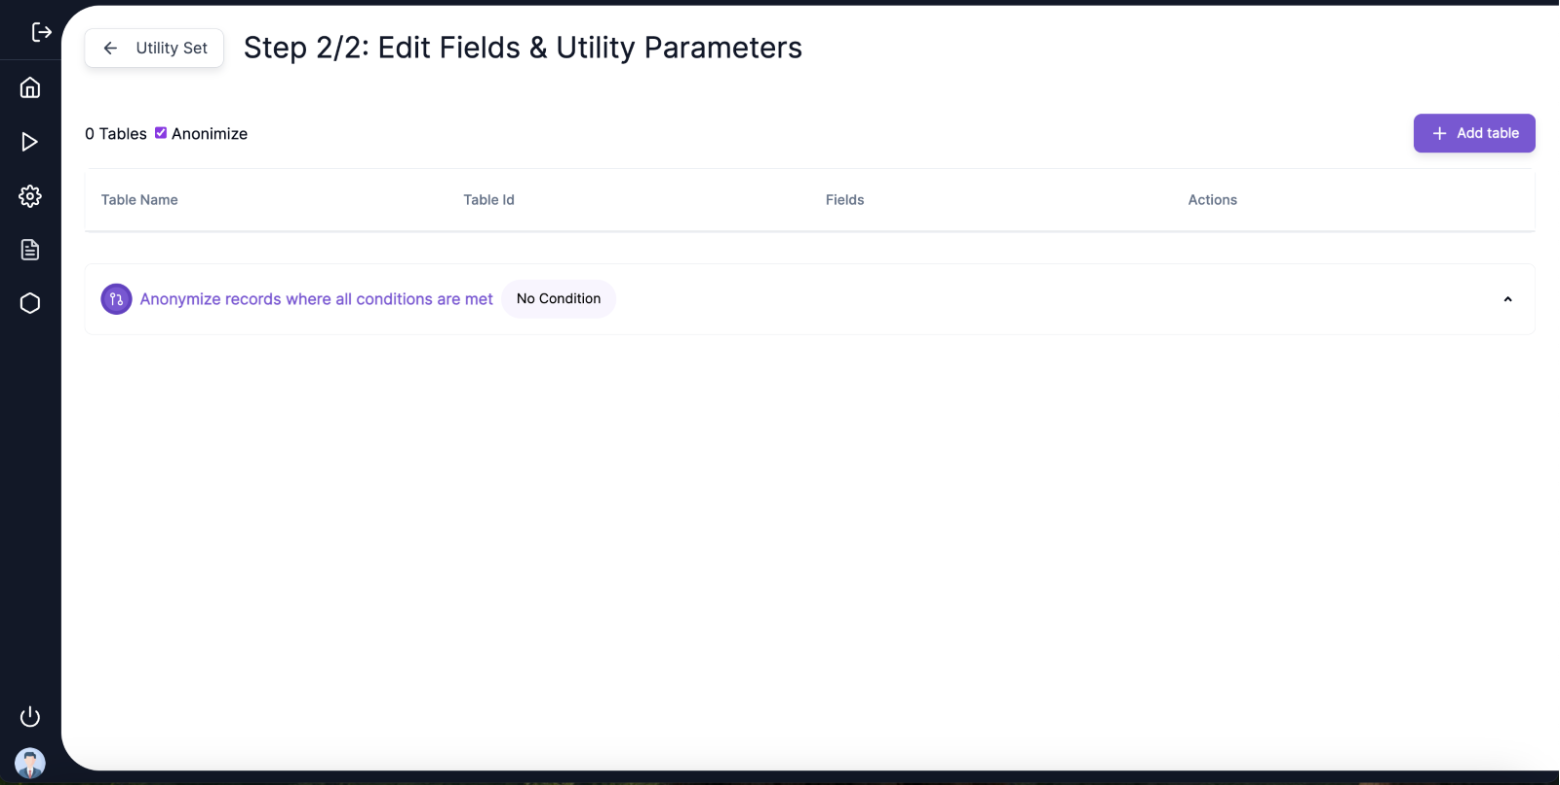
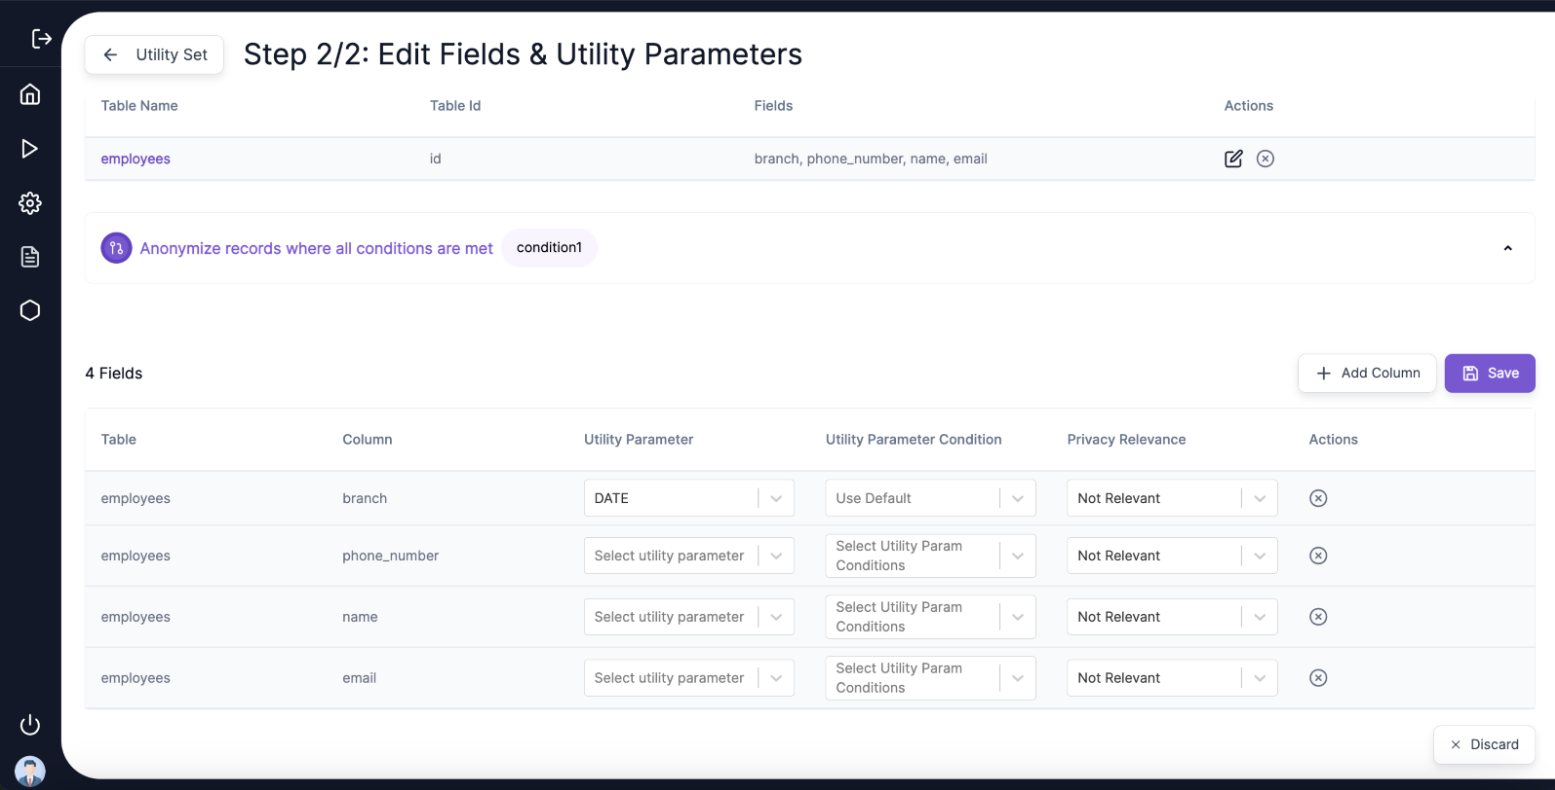
Edit Fields and Utility Parameters:
- On the next screen, users can enter single or multiple tables they want to anonymize.
- Click on Add Tables:
- A side panel will appear to fill in table details.
- Table ID: Represents the primary key of the table.
- Fields: Specify the columns to anonymize (multiple columns can be added as comma-separated values).
-
Add Conditions (Optional):
- Click Add a Condition to further filter the selected table data.
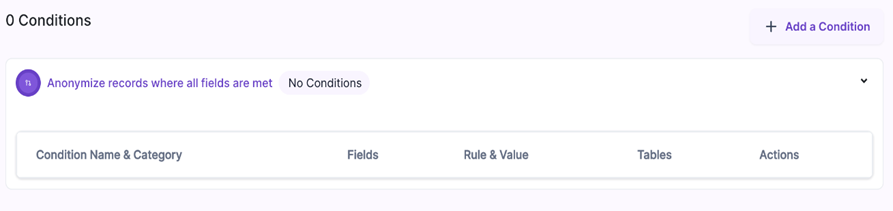
- The following details are required to add a condition:
Condition Details Table
| Input Field | Description | Values | Screenshot |
|---|---|---|---|
| Condition Name | Input field to define the name of the condition | ||
| Tables | Refers to the tables this condition will apply to | All in Utility Set / Particular Table | |
| Fields | Column of the table | ||
| Function | Is, Is Not (Blank Equal, Greater Than, Less Than, Start With, On the List (manual entry), Linked [table].[field]) | 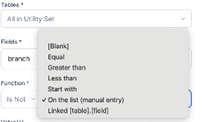 | |
| Values | Defines the value of the Field in the database | Input field to specify the conditions |
Example:
Condition: Filtering on the table patient where the value of the column branch is equal to Mining.
Managing Table Details in the Utility Set
- Edit Table Details:
- Click on the Table Name or Edit Option in the Utility Set Table.
- View the selected table and its respective columns for anonymization.
- Users can:
- Delete or add a new column for anonymization.
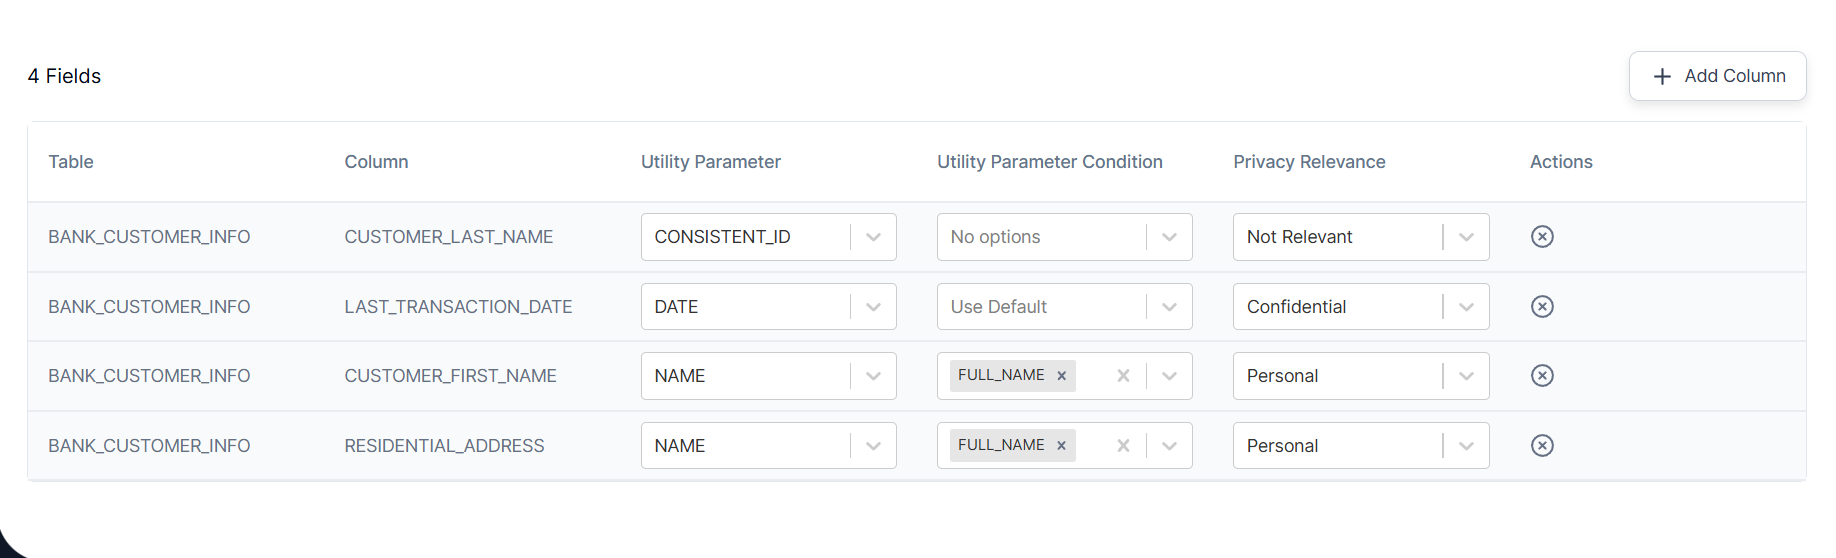
- Define the Utility Parameter, Utility Parameter Conditions, and Privacy Relevance.
Utility Parameters and Conditions
| Utility Parameters | Utility Conditions | Description |
|---|---|---|
| No Change | N/A | Leaves the data unchanged. |
| Clear Values | N/A | Clears the data in the selected fields. |
| Dummy Domain, Keep Domain, All Caps | Anonymizes email addresses with additional formatting options. | |
| Name | First Name, Last Name, All Caps, Full Name, Name | Handles name fields with specific conditions for first name, last name, etc. |
| Consistent ID | N/A | Generates a consistent identifier for tracking records. |
| Fixed Value | Input Field | Replaces the field with a fixed value. |
| Date | Same Year, Random, Adult, Consistent | Anonymizes date fields while retaining some options for consistency. |
| Phone Number | Random, Remove Country Code, CONSISTENT | Handles phone numbers by formatting them or generating new numbers. |
| Number | N/A | Randomizes or anonymizes numerical data. |
| Custom Expressions | N/A | Allows custom regular expressions or formats to be applied to the data fields. |
| Org Name | Company Name, Bank Name, Remove Org Suffix , All Caps | Anonymizes Organization Name to either Company Name or Bank Name based on the utility condition selected. Maintains consistency during the anonymisation. |
| Material Name | Fixed Mat, Random Mat, All Caps | Anonymizes the Material Name different formats based on the selected condition. |
| IBAN | N/A | Anonymizes the IBAN to an IBAN of the same country while retaining the length and the pattern. |
| Account Number | N/A | Anonymizes the Account Number using format preserving encryption. Retaining the length and numeric pattern. |
Condition-Specific Details:
-
Email Conditions:
- Dummy Domain: Replaces the email domain (e.g.,
example.com). - Keep Domain: Retains the original domain while anonymizing the rest of the email.
- All Caps: Anonymizes the original email and converts the entire email to uppercase.
- Dummy Domain: Replaces the email domain (e.g.,
-
Name Conditions:
- First Name: Anonymizes the name using the first_name anonymisation rule.
- Last Name: Anonymizes the name using the last_name anonymisation rule.
- All Caps: Anonymizes the name and converts the name to uppercase.
- Full Name: Anonymizes the name using the full name anonymisation rule.
- Name: This utility condition is used for the CONSISTENT anonymisation of names across applications. Appsafe, Filesafe, AISafe, Shared Point or AI Powered Run.
- If the name consists of any salutations like Mr., Mrs., Dr. Etc. then the system doesn’t treat the salutations as part of the Name. Below is a list of salutations which are currently removed while doing an anonymisation.
- For Example: Emma Smith will be anonymized to Dorothy1 Williams1
- Mrs Smith will be anonymised to Williams1
- Ms. Emma will be anonymised to Dorothy1
List of Salutations Currently Detected by the System
| Salutation | Example Name |
|---|---|
| MR | Mr. John Smith |
| MRS | Mrs. Elizabeth Johnson |
| MS | Ms. Angela Baker |
| MISS | Miss Emily Clark |
| MX | Mx. Taylor Morgan |
| DR | Dr. Alan Grant |
| PROF | Prof. Susan Walker |
| SIR | Sir James Windsor |
| MADAM | Madam Catherine Blake |
| DAME | Dame Margaret Cole |
| LORD | Lord Henry Cavill |
| LADY | Lady Charlotte Grey |
| REV | Rev. Thomas Hill |
| FR | Fr. Michael O'Brien |
| RABBI | Rabbi David Cohen |
| IMAM | Imam Ahmed Hassan |
| SHEIKH | Sheikh Omar Al-Fulan |
| PRES | Pres. Laura Bennett |
| PM | PM Richard Matthews |
| CH | Ch. Rachel Mendes |
| GOV | Gov. William Parker |
| MAYOR | Mayor Linda Torres |
| HON | Hon. Deborah Patel |
| SEN | Sen. Robert Greene |
| REP | Rep. Maria Lopez |
| AMB | Amb. Jonathan Li |
| SEC | Sec. Amanda Brooks |
| ABP | Abp. Francis Doyle |
| CARD | Card. Leonardo Rossi |
| BP | Bp. Gregory Hughes |
| POPE | Pope Benedict XVI |
| CAPT | Capt. Sarah Nolan |
| MAJ | Maj. Eric Daniels |
| COL | Col. Jacob Steele |
| GEN | Gen. Laura Whitman |
| CMDR | Cmdr. Anthony Reid |
| LT | Lt. Chloe Zhang |
| SGT | Sgt. Brian O'Connor |
| CPL | Cpl. Kevin Blake |
| CHIEF | Chief Monica Reyes |
| OFC | Ofc. Peter Jacobs |
| ENGR | Engr. Daniel Kim |
| ADV | Adv. Neha Reddy |
| JDG | Jdg. Michelle Grant |
| JST | Jst. Alan Romero |
| ESQ | John Edwards, Esq. |
| ATTY | Atty. Gloria Martinez |
| CLLR | Cllr. Richard Dawson |
| PRIN | Prin. Lily Thompson |
| DEAN | Dean Marcus Hill |
| CHAIR | Chair Olivia Brooks |
| CEO | CEO Benjamin Lee |
| CFO | CFO Anika Shah |
| COO | COO Henry Morrison |
| VP | VP Sophia White |
-
Date Conditions:
- Same Year: Keeps the year consistent across all records.
- Random: Randomizes the entire date.The random date will not be a future date.
- Adult: Ensures the date reflects an adult age between 18 to 80 years.
- Consistent: Keeps the date consistent across records. The consistent date will never be a future date.
-
Phone Conditions:
- Random: Randomizes the entire phone number.
- Remove Country Code: Removes the first 4 digits from the original phone number and generates a consistent anonymized value for the remaining number.
-
Org Name Conditions
- The default condition (if user doesn’t select any value) for an Org Name will be always Company Name.
- Bank Name: Replaces the Organization Name with an anonymized Bank Name. Also maintains consistency during the anonymisation process.
- Company Name: Replaces the Organization Name with an anonymized Company Name. Also maintaining consistency during the anonymisation process will, however, retain any suffix of the company name at the end.
- Remove Org Prefix: Anonymizes the Organization Name to a Company Name and removes the Suffix. The list of identified suffixes by the application is listed below. Users will not be allowed to select a Bank Name and a Remove Org Prefix combination.
- All Caps: Anonymizes the Org Name to Company Name and capitalizes it.
Identified Company Suffixes
| Suffix | Meaning / Region | Example Organization Name |
|---|---|---|
| Pvt Ltd | Private Limited Company (India) | InnoTech Solutions Pvt Ltd |
| Ltd | Limited Company (UK, India, etc.) | BlueWave Technologies Ltd |
| LLP | Limited Liability Partnership | Nexus Consulting LLP |
| OPC | One Person Company (India) | SmartRetail OPC Pvt Ltd |
| Inc | Incorporated (USA, Canada) | Acme Systems Inc |
| Corp | Corporation (USA) | NextGen Data Corp |
| LLC | Limited Liability Company (USA) | Quantum Softworks LLC |
| Co | Company (General) | TrustCo Insurance Co |
| PLC | Public Limited Company (UK, India, etc.) | GlobalFin PLC |
| GmbH | Gesellschaft mit beschränkter Haftung (Germany, Austria) | AutoWerk GmbH |
| AG | Aktiengesellschaft (Germany, Switzerland) | Siemens AG |
| SA | Société Anonyme (France, Spain, Switzerland) | BNP Paribas SA |
| NV | Naamloze Vennootschap (Netherlands, Belgium) | Shell NV |
| Oy | Osakeyhtiö – Ltd (Finland) | Nokia Oy |
| AB | Aktiebolag – Ltd (Sweden) | Ericsson AB |
| KK | Kabushiki Kaisha (Japan) | Toyota KK |
| SARL | Société à Responsabilité Limitée (France, Luxembourg) | Ubisoft SARL |
| Pte Ltd | Private Limited (Singapore) | Grab Holdings Pte Ltd |
| Sdn Bhd | Sendirian Berhad (Malaysia – Private Ltd) | Petronas Sdn Bhd |
| JSC | Joint Stock Company (Russia, CIS countries) | Rosneft JSC |
| AS | Aksjeselskap – Ltd (Norway, Estonia) | Telenor AS |
| PT | Perseroan Terbatas – Ltd (Indonesia) | Tokopedia PT |
| Unlimited | Unlimited Company (Ireland, UK – rare) | Harris Unlimited |
| PLLC | Professional Limited Liability Company (USA) | LegalEase PLLC |
| LP | Limited Partnership | Summit Partners LP |
| PC | Professional Corporation (USA) | Miller & Co. PC |
| SE | Societas Europaea – Public Company (EU-wide) | Airbus SE |
| IG | Interest Group or Informal Group (less formal usage) | TechFounders IG |
6. Material Name Conditions
-
The default condition (if user doesn’t select any value) for a Material Name will be always RANDOM_MAT condition.
-
RANDOM_MAT: Replaces the Material Name with a
MATERIAL_SEQUENCE_NO. Also, this condition will maintain consistency across the data. Example: “Inflammable Liquid” →MATERIAL_1 -
FIXED_MAT: Replaces the Material Name with an anonymized material name. This condition also maintains consistency across the data. Example: “Inflammable Liquid” →
RUBBER_1 -
All Caps: Anonymizes the Material Name using the selected method and capitalizes it.
Supported Date Formats
Hyphen (-) Formats
| Format | Example |
|---|---|
| yyyy-MM-dd | 2025-07-09 |
| dd-MM-yyyy | 09-07-2025 |
| MM-dd-yyyy | 07-09-2025 |
| yy-MM-dd | 25-07-09 |
| dd-MM-yy | 09-07-25 |
| MM-dd-yy | 07-09-25 |
Comma (,) Formats
| Format | Example |
|---|---|
| yyyy,MM,dd | 2025,07,09 |
| dd,MM,yyyy | 09,07,2025 |
| MM,dd,yyyy | 07,09,2025 |
| yy,MM,dd | 25,07,09 |
| dd,MM,yy | 09,07,25 |
| MM,dd,yy | 07,09,25 |
Dot (.) Formats
| Format | Example |
|---|---|
| yyyy.MM.dd | 2025.07.09 |
| dd.MM.yyyy | 09.07.2025 |
| MM.dd.yyyy | 07.09.2025 |
| yy.MM.dd | 25.07.09 |
| dd.MM.yy | 09.07.25 |
| MM.dd.yy | 07.09.25 |
Slash (/) Formats
| Format | Example |
|---|---|
| yyyy/MM/dd | 2025/07/09 |
| dd/MM/yyyy | 09/07/2025 |
| MM/dd/yyyy | 07/09/2025 |
| yy/MM/dd | 25/07/09 |
| dd/MM/yy | 09/07/25 |
| MM/dd/yy | 07/09/25 |
Space ( ) Formats
| Format | Example |
|---|---|
| yyyy MM dd | 2025 07 09 |
| dd MM yyyy | 09 07 2025 |
| MM dd yyyy | 07 09 2025 |
| yy MM dd | 25 07 09 |
| dd MM yy | 09 07 25 |
| MM dd yy | 07 09 25 |
No Separator Formats
| Format | Example |
|---|---|
| yyyyMMdd | 20250709 |
| ddMMyyyy | 09072025 |
| MMddyyyy | 07092025 |
| yyMMdd | 250709 |
| ddMMyy | 090725 |
| MMddyy | 070925 |
Special Case Formats
| Format | Example |
|---|---|
| MMM dd, yyyy | Jul 09, 2025 |
| MMM d, yyyy | Jul 9, 2025 |
| MMM dd, yy | Jul 09, 25 |
| MMM d, yy | Jul 9, 25 |
- Custom Expressions:
-
Definition: While creating a utility parameter, you can define the Utility Parameter as
Custom_Expression. -
SQL Expression: Custom expressions are SQL update queries that are executed once all the anonymizations are done.
-
Steps for Custom Expression:
- Select the Utility Parameter as
Custom_Expressionand enter the expression in the parameter text box. - Ensure that the expression follows correct SQL syntax.
- Select the Utility Parameter as
-
Guidelines for SQL Expression:
- Enclose table column names in hash characters (
#). - Enclose strings in single quotes (
'').
- Enclose table column names in hash characters (
-
Example of Custom Expressions:
- Example SQL expression:
UPDATE #table# SET #column# = 'new_value' WHERE #column# = 'old_value'
- Example SQL expression:
-
Restrictions:
- The application doesn't allow you to customize a column with
Custom_Expressionusing another column that also has a utility parameter selected asCustom_Expression.
- The application doesn't allow you to customize a column with
-
Utility Parameter Table
| Column | Utility Parameter | Utility Parameter Condition | Description |
|---|---|---|---|
| CUSTOM_EXPRESSION | normal-string | The email column will be anonymized with the anonymized value of the name column concatenated (symbol ` |
Privacy Parameter Classification
The Privacy Parameter is used to protect sensitive customer information, determining the logging behavior during job runs. It is classified into three categories: Personal, Confidential, and Non-Relevant.
Privacy Types and Logging Policies:
| Privacy Type | Example Data | Logging Policy |
|---|---|---|
| Personal | Name, Email, Phone Number | The original fields are not logged in the audit logs. |
| Confidential | Address, Account Number, Financial Details | The original fields are not logged in the audit logs. |
| Not Relevant | Non-sensitive data without privacy implications | Log original values in the audit logs. |
Privacy Classification:
- Personal: Data that can directly identify an individual, such as name, address, phone number, or email.
- Confidential: Data that is not directly identifying but is sensitive and private, such as account numbers, financial details, or proprietary business information.
- Not Relevant: Data that does not have privacy implications and does not directly or indirectly identify individuals or contain sensitive business information.
Final Steps:
- After entering the Utility Parameter, Utility Parameter Condition, and Privacy Parameter, click Save to finalize the settings.